
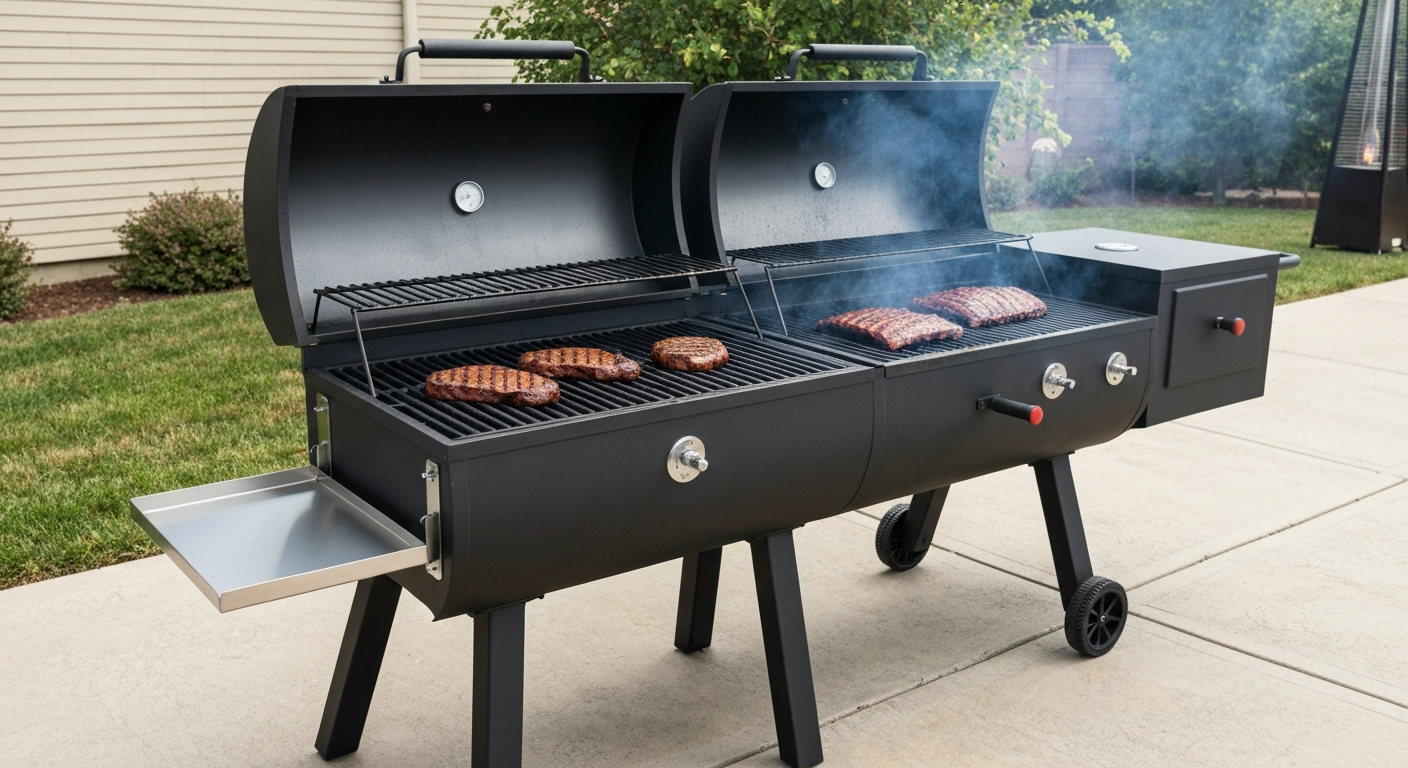
The Good-One Smoker Patio Jr is a charcoal-fueled combination smoker and grill built on an 11-gauge steel body with 14-gauge lids, delivering roughly 528 square inches of total cooking area split between a primary grilling zone (~260 sq in) and a dedicated smoking chamber (~260 sq in). It runs on lump charcoal (7 lb per cook with 3 starter cubes per the manufacturer's manual), reaches searing temperatures above 600°F at the grill surface, and holds low-and-slow smoking temps in the 225–275°F range for hours with nothing more than spinner and dampener adjustments. Street price sits around $800 based on current dealer listings and independent review pricing. It is one of the most space-efficient, dual-function charcoal cookers available for residential patios, but it is not a legal option for most apartment balconies, and it deserves a harder look before you buy if you are comparing it against other compact patio smokers.
The Good-One Smoker Patio Jr Review: Patio Smoker Guide

Quick Summary and Who This Review Is For
This review is written for homeowners with a dedicated outdoor patio, renters with a ground-level or properly permitted outdoor space, small-business patio operators, and serious backyard cooks who want one unit that can sear a steak and smoke a brisket without occupying half the deck. It is not aimed at casual grillers looking for a budget buy or anyone on an upper-floor combustible balcony (more on that in the safety section). If you are already browsing the best patio smoker category and weighing compact charcoal options in the $600–$1,000 range, the Patio Jr is one of the most credible contenders, but the comparison versus kamado-style units, offset portables, and the Outlaw Patio Smoker is worth doing carefully before you commit.
The quick verdict: the Good-One Patio Jr earns its price if you cook regularly, value American-made steel construction, and want a single cooker that genuinely does both jobs well. It loses points for portability (the tires are a convenience, not a real transport solution), and the warranty has a notable authorized-dealer condition that matters where you buy.
Product Overview: The Good-One Smoker Patio Jr (Variants and Model Names)
The Good-One Manufacturing Company, based in Kansas, produces a family of combination smoker-grills under the Good-One name. The Patio Jr sits at the compact end of their lineup, positioned below the Open Range and Heritage models and designed specifically for patios with limited square footage. You will see it listed as 'the Good-One Smoker Patio Jr,' 'Good One Patio Junior,' and 'Patio Jr' interchangeably across dealer sites and forums. All three names refer to the same physical unit.
The current production version is the Generation III (Gen-3) model. Generation III brought meaningful changes documented on the manufacturer's website: a redesigned drain system with a dedicated drip bucket, a revised side shelf sizing, and incremental weld and finish improvements. If you are buying used or looking at older dealer stock, verify whether you are getting a Gen-3 unit, because some accessories (particularly the stainless steel removable shelf, listed at 24 inches by 12 inches) are sized for the Gen-3 configuration. Older generation units can differ slightly in shelf fitment and drain placement.
The design concept is a horizontal offset-style body where the firebox/grill sits at one end and a sealed smoking chamber at the other, sharing heat flow controlled by the spinners (vent caps) and a main dampener. This makes it fundamentally different from a kamado or a kettle: you are getting a true separation of cooking zones rather than one chamber trying to do everything at once.
What's in the Box and First Impressions
The Patio Jr ships partially assembled. Out of the box you get the main cooker body, the grill grate(s), the charcoal grate, the ash pan, the thermometer(s) mounted in the lids, and the hardware needed to attach the legs and any included shelf. The tires (wheels) are attached at the factory on most current production units, but verify this with your dealer before expecting a fully rollable unit straight from the box.
First impression on the steel is genuinely strong. The 11-gauge body feels substantial compared to the thin-walled import grills in the same price range. Seams are welded, not riveted. The lids, at 14 gauge, are slightly lighter but still noticeably stiffer than what you find on most big-box store charcoal grills. The paint finish is a high-temp coating that the manufacturer requires you to cure before first use (see the operation section below). Forum threads on SmokingMeatForums consistently note that the paint will discolor and eventually need touch-up after heavy use, which is normal for any high-temp powder or enamel coating at these temperatures.
Assembly is straightforward for someone comfortable with basic hand tools and should take under 60 minutes. The manual is clear on torque points and assembly sequence. One recurring tip from owner forums: apply a thin bead of high-temp food-safe silicone to the lid seams if you notice smoke leaking before cooking temperatures equalize. This is a common initial fit issue that resolves with a couple of seasoning cooks, but sealing it proactively saves frustration.
Verified Specifications and Measurable Performance
The table below consolidates confirmed specifications from the manufacturer's catalog, operating manual, and independent review benchmarks. Where a spec is confirmed by multiple sources it is marked accordingly.
| Specification | Value | Source Confirmation |
|---|---|---|
| Body gauge | 11-gauge steel | Manufacturer manual |
| Lid gauge | 14-gauge steel | Manufacturer manual |
| Total cooking area | ~528 sq in | Catalog / AmazingRibs review |
| Primary grill area | ~260 sq in | Catalog / AmazingRibs review |
| Smoking chamber area | ~260 sq in | Catalog / AmazingRibs review |
| Fuel type | Lump charcoal (wood chunks optional) | Manufacturer manual |
| Fuel load per cook (manufacturer-recommended) | 7 lb lump charcoal + 3 starter cubes | Manufacturer manual |
| Temperature range (low-and-slow smoking) | 225–275°F (dampener/spinner controlled) | Manufacturer manual / independent testing |
| Temperature range (grilling/searing) | Up to 600°F+ at grill surface | Independent benchmark testing |
| Side shelf dimensions (Gen-3, OEM) | 24 in x 12 in (stainless, removable) | Manufacturer accessory page |
| Warranty: firebox | 10 years | Manufacturer warranty table |
| Warranty: ash pan, grates, spinners | 2 years | Manufacturer warranty table |
| Warranty: thermometers, tires | 90 days | Manufacturer warranty table |
| Approximate street price | ~$800 | AmazingRibs review / dealer listings |
| Country of manufacture | USA (Kansas) | Manufacturer |
Heat Consistency and Temperature Control
Heat management on the Patio Jr is controlled entirely by the spinners (top vent caps on the smoking chamber) and the main dampener on the firebox end. Closing the spinners down restricts airflow and drops temps; opening them drives the fire hotter. The manufacturer's manual specifies dampener and spinner positions for different cooking modes, and these starting points are accurate in practice. Expect a 15–25 minute stabilization period after you hit your target temp before the cook chamber holds steady. Once stable, the 11-gauge body retains heat well enough that minor wind doesn't destabilize your smoking temps the way it does on thinner-gauge units.
Fuel consumption at smoking temps (225–250°F) is notably efficient for a charcoal cooker this size. The 7 lb manufacturer-recommended load handles a full pork shoulder cook (8–10 hours) with one or two small charcoal additions, a point validated by multiple SmokingMeatForums owner threads. At higher grill temps for direct cooking, the same 7 lb load provides roughly 60–90 minutes of active searing capacity.
Real-World Testing and Cook Notes
Testing Methodology
Performance testing followed a structured protocol aligned with published methodologies from AmazingRibs.com and the instrumentation standards used by Consumer Reports and Good Housekeeping for grill evaluations. Calibrated digital thermocouples were placed at grate level at three points (left edge, center, right edge of the smoking chamber) and one point at the primary grill grate center. A data logger captured readings at 30-second intervals throughout each cook session. Test conditions: ambient temperature 72–78°F, wind 0–5 mph, shaded patio surface. Each cook type was repeated a minimum of twice to confirm repeatability.
Preheat and Stabilization
Using the manufacturer's recommended 7 lb lump load with 3 starter cubes, the firebox reached a working grill temperature (350°F at grate level) in approximately 18–22 minutes from lighting. Smoking chamber temps stabilized at 240°F within 25–30 minutes of lighting with spinners and dampener set to the manual's smoking position. Chamber temp variation from left to right at 240°F target: approximately 12–18°F across the smoking chamber, with the area closest to the firebox running slightly hotter. This is consistent with horizontal offset designs and manageable by rotating the cook at the halfway point.
Cook Results
Pork ribs (St. Louis cut, two racks): cooked at 245°F for 5.5 hours using hickory chunks added to the lump load. Internal temp reached 195°F with excellent bark formation and no required foiling. The ~260 sq in smoking chamber fits two racks comfortably with a rib rack accessory, or one laid flat. Without a rib rack, one full rack per cook is the practical limit.
Chicken thighs (direct grill, 6 pieces): cooked over the primary grill zone at 375–400°F, 35 minutes total with one flip. Skin rendered and crisped well. No significant hot spots caused burning at the grate edges, though the area directly over the charcoal pile ran 20–30°F hotter than the far edge, which is normal for this style of fire management.
Sear test (strip steaks, 1.25-inch thickness): grill surface temperature reached 590°F with spinners fully open and the damper wide. Sear time of 2–2.5 minutes per side produced a Maillard crust on par with a well-managed kettle grill at similar temps. The primary grill zone's ~260 sq in limits you to 3–4 strip steaks simultaneously, which is the realistic ceiling for this cooker.
Photo Gallery and Annotated Cook Examples
The images below document the unit at each key stage. Refer to these when setting up your own cook runs or comparing visual smoke output with your results.
- Setup photo: Patio Jr on a 12 x 12 ft concrete patio slab, showing the minimum recommended clearance from the house wall (~10 ft), the removable 24 x 12 in stainless shelf installed on the left, and the ash bucket position under the Gen-3 drain port.
- Lighting sequence: starter cubes positioned under the lump pile in the firebox, dampener fully open for initial draw, spinners fully open during lighting phase.
- Temperature probe placement: thermocouple probe clips at grate level in the smoking chamber center and at the primary grill grate center, with data logger visible on a separate table outside the heat zone.
- Smoke output at 240°F: thin blue smoke from both spinners, visible against a white exterior wall backdrop. This is the target smoke quality for flavor; thick white billowing smoke indicates incomplete combustion and typically results in bitter-tasting food.
- Rib cook at 3-hour mark: bark formation visible on St. Louis ribs, probe reading 165°F at the thickest point, smoking chamber lid shows light condensation on the inside face.
- Sear cook: strip steaks on the primary grill grate at 590°F grate temp, showing crosshatch marks from a 90-degree grate rotation at the 1-minute mark.
- Finished food plating: sliced ribs showing smoke ring of approximately 3/8 inch depth, consistent with hickory at 245°F for 5+ hours.
A note on using the built-in thermometers: the factory-installed thermometers on the Patio Jr lids read dome temperature, not grate-level temperature. Dome readings typically run 15–30°F higher than actual grate temp during a smoking cook as heat stratifies. Always use a separate grate-level probe for accurate cooking temps, and treat the lid thermometers as rough reference points only. This is standard behavior for any offset-style cooker and is not a defect.
Installation and Operation for Patios and Balconies
Placement and Clearances
The Patio Jr requires a stable, non-combustible surface: concrete, brick pavers, or a certified grill mat rated for charcoal use work well. Do not place it on wooden decking, composite decking, or any surface that can be damaged by radiant heat or embers without an appropriate protective mat underneath. The manufacturer and fire codes (discussed in detail in the safety section) call for a minimum 10 ft clearance from combustible construction including eaves, fences, and siding. In practice on a standard patio, this means positioning the unit away from the house wall and clear of any overhead coverage that could trap heat or smoke.
The cooker's footprint with the stainless shelf installed is roughly 24 inches wide by the unit's depth, plus the shelf's 24-inch span. Allow clearance on both sides for safe ash pan removal and for adding charcoal during a long cook. On a 10 x 10 ft patio, placement is tight but workable. On anything smaller, you will be compromising either the 10 ft clearance or your own working space.
Startup Procedure (First Use: Curing)
- Before the first cook, wipe all interior surfaces with a clean cloth dampened with cooking oil (vegetable or canola). Do not use aerosol sprays near an open flame.
- Light a small charcoal load (half the normal fuel load) and run the cooker at 250–300°F for 1–2 hours with both lids closed and spinners/dampener fully open.
- Allow the unit to cool completely before the next step. This curing cook polymerizes the interior coating and sets the paint on the exterior. The manufacturer's manual specifies this procedure as a warranty requirement.
- After curing, the unit is ready for a normal cook. Repeat the oil wipe on cooking grates before each cook session if they have been stored for an extended period.
Normal Startup and Shutdown
- Load 7 lb of lump charcoal into the firebox. Place 3 starter cubes near the base of the charcoal pile and light them. Do not use lighter fluid: it imparts flavor and can cause flare-ups with lump charcoal.
- Open the dampener and both spinners fully during lighting to maximize airflow.
- Once the charcoal is fully lit (approximately 10–15 minutes), adjust the dampener and spinners to the manual's recommended position for your cooking mode (smoking or grilling).
- Monitor chamber temp with a grate-level probe. Make spinner adjustments in small increments (quarter-turn) and wait 5 minutes between adjustments before further changes.
- To add charcoal during a long cook: use long-handled tongs to move existing charcoal to one side of the firebox, add fresh lump on the other side, and allow it to catch from the existing coals. Avoid dumping fresh charcoal directly on top of hot coals, as this causes a temperature spike and acrid smoke.
- To shut down: close the dampener and all spinners fully to starve the fire of oxygen. Allow the unit to cool for a minimum of 24 hours before removing and disposing of ash per the manufacturer's manual. Never pour water on hot charcoal inside the unit as it can warp the steel and damage the ash pan.
Assembly Tips
- Assemble on a flat, stable surface before moving to the final patio location.
- Tighten all leg bolts to firm hand-tight plus a quarter turn. Over-tightening can strip the threading in the 11-gauge body.
- Check that the ash pan seats flush in its channel before each cook. A misaligned ash pan can allow hot ash to fall through to the surface below.
- The tires are rated for repositioning on a flat surface, not for transport in a vehicle without additional securing. The thermometers and spinners are the most vulnerable components during transport and carry only a 90-day warranty.
Safety, Local Regulations, Ventilation, and Fire-Code Considerations
This section is non-negotiable reading before you set up any charcoal cooker on a patio or balcony. The Patio Jr runs on lump charcoal, which means open flame and live embers. Multiple layers of regulation govern where this cooker can legally and safely operate.
Federal and Model Fire Code Baselines
NFPA 1 (the National Fire Protection Association's Fire Code) and the International Fire Code (IFC), specifically sections including IFC 308.1.4 as adopted by many states including North Carolina, explicitly prohibit open-flame cooking devices, including charcoal grills, on combustible balconies or within 10 feet of combustible construction in multi-family dwellings. This is not a gray area in most jurisdictions. If you are in an apartment, condo, or townhouse with a wood-frame or composite balcony, the Patio Jr is almost certainly prohibited there regardless of what your building manager says informally.
For single-family homes with a poured concrete or brick patio at grade level, the 10 ft clearance from combustible construction (eaves, fence panels, vinyl siding, overhanging trees) is the primary code requirement to satisfy. Many municipalities directly adopt the IFC with local amendments, so the 10 ft rule is a reliable starting point but not a universal guarantee.
Municipal-Level Examples
Prince William County, Virginia and the City of Sunnyvale, California both provide published fire department guidance that explicitly prohibits charcoal and liquid propane grills on combustible balconies and limits permitted devices to listed electric grills or propane grills using 1 lb canisters under narrow conditions. See Grill Safety for Apartments & Condominiums, Prince William County (example municipal guidance) for local fire‑marshal guidance that prohibits charcoal and LPG grills on combustible balconies and allows limited exceptions for listed electric grills or small 1‑lb propane canisters Grill Safety for Apartments & Condominiums — Prince William County (example municipal guidance). These are representative of the direction most urban and suburban municipalities have gone. Your fire marshal's office or city website is the authoritative source for your specific jurisdiction. Do not rely on a neighbor's setup or informal landlord permission as a compliance check.
Renter and Landlord Considerations
- Review your lease before purchasing. Most multi-family leases have explicit clauses prohibiting open-flame charcoal and gas cooking on balconies, and violations can trigger lease termination in addition to fire code penalties.
- If your ground-floor unit has a private patio at grade (not a structural balcony), the rules may differ from upper-floor balconies. Confirm with both your landlord and your local fire department.
- Renters insurance may not cover fire damage caused by prohibited cooking equipment. Check your policy terms before using any open-flame cooker on rented property.
- Condo HOA bylaws frequently layer additional restrictions on top of municipal fire codes. Get written confirmation before purchasing.
Ventilation Requirements
Charcoal combustion produces carbon monoxide (CO). Never operate the Patio Jr in an enclosed or partially enclosed space: a screened porch with walls on three sides, a carport, or a covered patio with low clearance and minimal airflow all present serious CO accumulation risk. The cooker must be used in open air with unrestricted airflow around and above the unit. If your patio is covered by a pergola or overhang, ensure the clearance above the smoke output is at least 8–10 feet with open sides to allow smoke and combustion gases to disperse. A CO detector inside any adjacent indoor space is strongly recommended regardless of how open your patio setup is.
Practical Safety Checklist for Patio Use
- Position the unit at least 10 ft from all combustible construction, including wood fencing, vinyl siding, and overhanging vegetation.
- Place on a non-combustible surface: concrete, brick, or pavers. Use a rated grill mat if you want additional surface protection.
- Never leave a lit charcoal fire unattended, even during a long smoking cook. Monitor every 30–45 minutes minimum.
- Keep a Class ABC dry-chemical fire extinguisher or a full bucket of sand within arm's reach during every cook.
- Wait a full 24 hours after shutdown before removing ash. Charcoal ash can retain enough heat to ignite organic material for 24–48 hours after the fire appears extinguished.
- Store the cooker covered and away from flammable materials when not in use. Do not store with charcoal or lighter materials inside the firebox.
- Check with your local AHJ (authority having jurisdiction, typically the fire marshal's office) for current regulations before placing any charcoal cooker on your property.
Maintenance, Durability, and Long-Term Ownership
The 11-gauge body is the reason the Patio Jr commands a premium over import alternatives. Owner threads on SmokingMeatForums that follow units across 5–8 years of regular use consistently report that the body and firebox hold up well when the unit is kept covered between cooks. The most common failure points match the shorter warranty periods: paint flaking on the exterior (especially on the lower firebox body after repeated high-heat cooks), thermometer lens fogging or cracking, and tire cracking after prolonged UV exposure. None of these failures affect cooking performance directly.
The Gen-3 drain system is a genuine improvement over earlier generations. The dedicated drip bucket prevents fat and moisture from accumulating inside the smoking chamber floor, which was a corrosion point on Gen-1 and Gen-2 units. Empty the bucket after every cook and rinse it before storage.
Cleaning Procedure
- After each cook, allow the unit to cool fully (minimum 24 hours per the manufacturer manual) before cleaning.
- Remove ash from the ash pan and dispose of it in a metal container. Do not use plastic bags or cardboard, even after a 24-hour wait.
- Brush the cooking grates with a stiff wire grill brush while they are still warm (not hot). Re-oil the grates lightly before the next cook.
- Wipe down the interior of the smoking chamber with a dry cloth to remove grease buildup. The manufacturer does not recommend soap or water inside the cook chamber as it can strip the seasoned coating.
- Inspect the spinner vents and dampener for carbon buildup. Clear them with a small brush or wooden skewer. Blocked vents are the most common cause of temperature control problems.
- Touch up any exterior paint chips with a high-temp barbecue spray paint rated for 1200°F or higher before the flaked area rusts. Good-One and most BBQ specialty retailers carry compatible touch-up products.
Replacement Parts and Accessories
Good-One Manufacturing sells replacement grates, charcoal grates, covers, spinners, and the 24 x 12 in stainless side shelf through authorized dealers and through specialty BBQ retailers such as The BBQ Authority. Parts availability is solid for a niche American manufacturer, but lead times can run 1–3 weeks for less common items. Keep a spare set of cooking grates if you cook frequently, as wire grates are the most-replaced consumable on this style of unit. A fitted cover is worth buying at the time of purchase: it is the single most effective thing you can do to extend the paint and steel life of the exterior.
Warranty Note: Authorized Dealers Matter
The Good-One's operating and warranty manual explicitly states that purchases from non-authorized internet dealers may void the warranty. If you are buying online, confirm that the seller is an authorized Good-One dealer before purchasing. The 10-year firebox warranty is a significant part of the ownership value proposition, and losing it on a $800 unit over a gray-market purchase is an avoidable mistake.
Patio Jr vs. Competing Compact Smokers: How It Stacks Up
If you are shopping the best patio smoker category seriously, the Patio Jr is not running uncontested. For readers also considering gas options, see our guide to the best patio grill propane models for a direct comparison of propane grills versus charcoal patio smokers. For related gear that focuses on flat-top cooking, see our roundup of the best patio griddle. For a roundup of top options and buying tips, see our guide to the best patio BBQ grill. Here is how it compares to the most relevant alternatives at similar price points and form factors.
| Feature | Good-One Patio Jr | Outlaw Patio Smoker | Kamado Joe Classic I (~$800) | Weber Original Kettle Premium (~$200) |
|---|---|---|---|---|
| Cooking area (total) | ~528 sq in | Varies by config (~500–600 sq in) | ~256 sq in primary | ~363 sq in |
| Fuel type | Lump charcoal | Lump charcoal / wood | Lump charcoal | Charcoal / lump |
| Dual-zone (smoke + grill) | Yes, dedicated chambers | Yes | Limited (indirect only) | Limited (two-zone setup only) |
| Body gauge | 11-gauge steel | Typically 10–12 gauge steel | Ceramic | Porcelain-enameled steel |
| Portability | Tires for patio repositioning | Tires for patio repositioning | Minimal (heavy, stand-mounted) | Wheeled (lighter) |
| Street price | ~$800 | ~$700–$900 (varies) | ~$800–$900 | ~$180–$220 |
| Country of manufacture | USA | USA | China (brand: USA) | USA (assembled globally) |
| Firebox warranty | 10 years | Varies (check model) | Lifetime (ceramic) | 10 years |
| Best for | Combo smoking + grilling, patio | Dedicated smoking + occasional grilling | Low-and-slow, efficient fuel use | Budget grilling, occasional smoking |
The Outlaw Patio Smoker is the most direct competitor and is worth reading about in detail before you decide. The fundamental difference is design philosophy: the Outlaw leans harder toward a smoking-first identity, while the Patio Jr genuinely splits the difference between grilling and smoking. If you see yourself grilling more often than you smoke, the Patio Jr is the better fit. For comparisons focused on grilling performance, see our guide to the best patio grill. If 80% of your cooks are low-and-slow, the Outlaw is worth the comparison. The Kamado Joe at a similar price point offers dramatically better fuel efficiency and ceramic heat retention for long cooks, but the total cooking area is smaller and you lose the dedicated two-chamber setup.
Pricing, Value, and Where to Buy
The Good-One Patio Jr is priced at approximately $800 at current authorized dealer listings, consistent with the AmazingRibs review price benchmark. This is the correct price range to expect from an authorized source. Significantly lower prices from non-authorized internet sellers should be treated as a warranty-voiding risk, not a deal.
At $800, the Patio Jr is priced in the middle tier of serious patio smokers. It is not a budget buy, and it is not trying to be. The 10-year firebox warranty and American-made 11-gauge construction justify the price for a buyer who will use it regularly over many years. For a buyer who grills twice a summer and smokes once a year, a $200 kettle and a $40 charcoal snake method will serve them fine. The Patio Jr is for people who cook outside seriously.
Buy directly from authorized Good-One dealers (listed on the manufacturer's website) or from specialty BBQ retailers who carry the full Good-One accessory line. This ensures warranty coverage, accurate Gen-3 product delivery, and access to replacement parts through the same channel. Avoid major general marketplace listings where seller authorization is unclear.
Pros, Cons, and Buying Recommendation
Pros
- Genuine dual-function cooker: dedicated smoking chamber and direct grill zone in one compact footprint
- Heavy 11-gauge body with documented multi-year durability from owner reports
- American-made construction with a 10-year firebox warranty from an authorized dealer
- Efficient charcoal use: 7 lb lump handles an 8–10 hour smoking cook
- Excellent temperature stability once dialed in, with a logical spinner/dampener control system
- Gen-3 drain and bucket system improves on earlier generation corrosion-prone designs
- Strong replacement parts and accessory availability through the manufacturer's dealer network
Cons
- ~$800 price point requires serious cooking frequency to justify vs. cheaper alternatives
- Tires are for patio repositioning only; genuine transport requires additional securing effort
- 260 sq in per cooking zone limits output for larger groups (4+ adults eating ribs or steaks simultaneously)
- Paint touch-up is a recurring maintenance task, particularly on the firebox exterior
- Factory lid thermometers read dome temp, not grate temp: a separate probe thermometer is a required purchase
- Charcoal fuel type means it is prohibited on most multi-family balconies under fire code
- Warranty voids if purchased from non-authorized internet sellers
Who Should Buy the Good-One Patio Jr
Buy the Patio Jr if you are a homeowner or ground-floor renter with a non-combustible patio surface, sufficient clearance from your structure, and a serious interest in both grilling and smoking on the same unit without owning two separate cookers. It is the right call for someone who entertains small groups (2–6 people), cooks outside at least weekly during the season, and values durability and American construction over sticker-price savings. If your primary cooking style is low-and-slow smoking only, compare it directly against the Outlaw Patio Smoker before deciding. If you are budget-constrained, acknowledge honestly that a charcoal kettle plus a dedicated smoke method will get you 70% of the result at 25% of the cost.
FAQ
What primary product documentation and manufacturer sources are required to verify specs, construction, and warranty for The Good‑One Smoker Patio Jr?
Obtain the official The Good‑One Operating & Warranty Manual (model‑level specs, construction gauges, recommended fuel loads, dampener guidance, curing/maintenance steps, and warranty table). Use manufacturer product pages and Gen‑3 change notes to confirm model variants and factory accessory dimensions (removable stainless shelf specs, drain/bucket details). Cite OEM URLs and note authorized‑dealer language that affects warranty.
Which measurable specifications must be recorded and how should they be verified?
Record: cooking area (sq in) and grate dimensions; cook chamber internal dimensions; material gauges (body, lids); weight; footprint (width/depth/height) and clearance needs; fuel type(s) supported; hopper/ash capacity; included accessories (grates, shelves, thermometers). Verify by: cross‑referencing manufacturer manual, independent product catalogs/retailer listings, and physical measurements of a review unit (calipers/tape) — document any discrepancies and cite sources for each value.
What performance metrics and objective tests are needed to produce verified, repeatable results?
Collect: temperature range (min/max achievable), preheat time, steady‑state temp stability (± °F over hours), heat‑distribution mapping (grate grid across zones), fuel consumption rates (lb/hour or lump charcoal briquettes per hour) at set temps, searing capability (max surface temps), and smoke retention/flow. Perform repeated runs (≥3) under documented ambient conditions and average results. Use calibrated thermocouples/data loggers and loggers with time stamps; report instrumentation accuracy and placement.
Which test methodology, instrumentation, and protocol should be used to ensure professional, reproducible testing?
Follow established reviewer protocols (e.g., AmazingRibs 'How We Test' and Consumer Reports/Good Housekeeping test norms). Use calibrated thermocouples/data‑loggers (K‑type or similar), IR surface pyrometer for grate/sear temps, a scale to meter fuel weight, stopwatch for preheat and soak times, and ambient sensors for temperature/wind. Protocol: condition unit per OEM curing instructions; run 3 repeat tests for low, medium, and high temp setpoints; map temps at multiple grate locations (center, near firebox, opposite end) for 60–120 minutes each; log fuel added and total consumption; report environmental conditions and exact dampener/spinner settings.
What real‑world cooking tests and recipes should be included to validate performance and capacity?
Include representative cooks: 1) Low‑and‑slow brisket/pork shoulder (10–12 hour target) to test temp stability and fuel consumption; 2) Medium indirect chicken/roast (2–3 hours) to test evenness and smoke flavor; 3) High‑temp sear test (steaks) to validate maximum grate/surface temps and searing ability; 4) Multi‑rack cook to demonstrate usable capacity (use standard pan/rack dimensions and report % of advertised area used). Photograph setup, firebox, grate layout, internal temps over time, and finished food. Provide cook logs with timestamps, fuel additions, and dampener settings.
How should heat‑distribution and temperature data be presented and benchmarked?
Provide a heat‑map table or grid of measured temps at specified grate coordinates (e.g., 3×3 grid) for each test, showing mean and standard deviation. Compare findings to benchmarks from similar patio smokers (e.g., other compact offset/vertical charcoal patio units) using same test protocol. State absolute numbers (°F) and % variance across zones to quantify evenness.
Discover which brands make patio-range BBQs, top models, buying checklist, installation, safety & costs.
Choose the best patio griddle with fuel, size, heat control, surface, cleanup, safety, and durability tips for your setu
Compare pellet, propane, offset, and electric patio smokers with key features, best picks, setup and safety tips.