
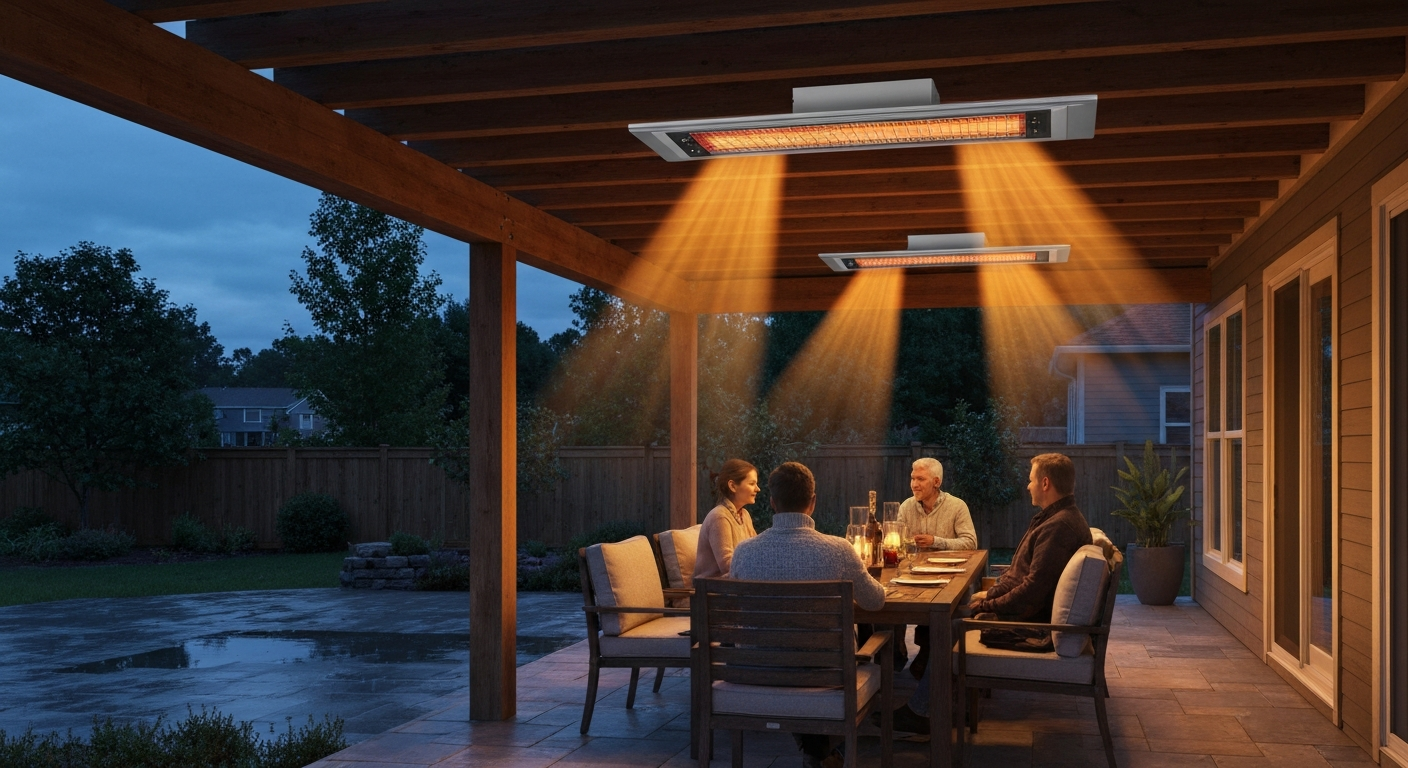
The best ceiling mounted electric patio heaters for most covered patios are hard-wired infrared models in the 2–4 kW range, rated IP55 or higher, mounted 8–10 feet above the floor. Units like the Bromic Tungsten Smart-Heat Electric (2.0–4.0 kW), Infratech W-Series (1.5–6.0 kW), and Heatstrip Classic deliver focused, glare-reduced heat with no combustion, no carbon monoxide risk, and flush or semi-recessed mounting options that keep sightlines clean. If you have a covered patio, pergola, gazebo, or enclosed restaurant terrace with an existing 240V circuit, ceiling mounting is almost always the cleanest and most efficient installation approach, heat travels straight down into the occupied zone instead of fighting convection from the sides.
Best Ceiling Mounted Electric Patio Heaters: Top Picks & Guide

Caleb Vale
13 Jul 2026
What ceiling-mounted electric patio heaters are and who this guide is for
Ceiling-mounted electric patio heaters are permanently fixed heating appliances installed on the underside of a covered patio roof, pergola beam, gazebo ceiling, or overhead structure. They draw power from a dedicated electrical circuit, require no gas line or fuel storage, and direct radiant or convective heat downward into the occupied space. Unlike portable or free-standing units, they are part of the structure, so the choice of model, placement, and electrical supply needs to be right before you ever flip the switch.
This guide is written for homeowners adding heat to a covered back patio or screened lanai, property managers upgrading a commercial terrace, restaurant and bar owners extending outdoor dining through shoulder seasons, and installers who want a reliable spec checklist. If you are shopping for a wall-mounted unit instead, or considering a hanging pendant-style heater, those options are covered in the related guides on this site. See our guide to the best overhead patio heaters for independent reviews and picks across mounting styles. But if the ceiling is your mounting surface, read on.
Quick recommendations by use-case and budget
Rather than ranking products in an arbitrary order, the picks below are organized around the specific situation where each model genuinely performs best. All prices are approximate retail as of mid-2026 and will vary by retailer and region.
- Best overall for residential covered patios: Bromic Tungsten Smart-Heat Electric 4000W (~$650–$750). Covers roughly 130 sq ft at a 9 ft ceiling, IP55 rated, available in flush/recess-kit version, Smart-Heat zone control compatible, 7-year element warranty. The benchmark most other brands are compared against.
- Best for large commercial terraces: Infratech W-Series 6000W (~$700–$850). Up to ~200 sq ft coverage per unit, robust aluminum housing, available in multiple mounting configurations, widely used in restaurant and hospitality installs. Pairs well in multi-unit grid layouts.
- Best mid-budget residential pick: Heatstrip Classic 2400W (~$380–$450). 240V hard-wired, IP65 rated (best-in-class ingress protection at this price), cETLus listed, suits patios up to ~80 sq ft. Residential warranty is 24 months.
- Best for small covered spaces or tighter budgets: Dr. Infrared Heater DR-238 1500W (~$180–$220). 120V plug-in operation means no electrician required for basic installs, though ceiling-mount hardware requires careful anchoring. Covers up to ~150 sq ft in calm, enclosed conditions. Not a substitute for a hard-wired unit in open or windy environments.
- Best plug-in ceiling option for apartments or rentals: Briza Infrared Ceiling Heater 1500W (~$120–$160). Remote and app controlled, 120V, mounts to standard junction box. Best suited to glazed sunrooms or very sheltered patios where the convenience of a plug-in outweighs the lower heat output.
- Best recessed/flush ceiling install: Bromic Tungsten Electric 2000W with Recess Kit (~$700–$800 combined). The recess kit (sold separately) allows the heater body to sit flush with the ceiling surface, which is visually ideal for coffered or timber ceilings. Maintains full IP55 rating after recessed installation per Bromic's install manual.
Ceiling-mounted electric patio heater comparison table
| Model | Power (kW) | Coverage (sq ft) | IP Rating | Controls | Dimensions (in) | Warranty | Est. Running Cost (per hr @ $0.15/kWh) |
|---|---|---|---|---|---|---|---|
| Bromic Tungsten Smart-Heat Electric 4000W | 4.0 | ~130 | IP55 | On/off, Smart-Heat zone control, optional dimmer | 44.9 × 3.9 × 3.0 | 2 yr heater / 7 yr element | $0.60 |
| Bromic Tungsten Smart-Heat Electric 2000W | 2.0 | ~65 | IP55 | On/off, Smart-Heat zone control, optional dimmer | 25.2 × 3.9 × 3.0 | 2 yr heater / 7 yr element | $0.30 |
| Infratech W-Series 6000W (W-30) | 6.0 | ~200 | IP44 | On/off, optional multi-zone controller | 61.0 × 5.0 × 4.5 | 1 yr residential / 1 yr commercial | $0.90 |
| Infratech W-Series 3000W (W-15) | 3.0 | ~100 | IP44 | On/off, optional multi-zone controller | 30.5 × 5.0 × 4.5 | 1 yr residential / 1 yr commercial | $0.45 |
| Heatstrip Classic 2400W | 2.4 | ~80 | IP65 | On/off wall switch; remote optional | 35.4 × 3.5 × 2.8 | 24 mo residential / 12 mo commercial | $0.36 |
| Dr. Infrared DR-238 1500W | 1.5 | ~150 (enclosed) | IP55 | Remote control, thermostat | 32.3 × 5.1 × 4.5 | 1 yr | $0.23 |
| Briza Infrared Ceiling 1500W | 1.5 | ~100 | IP44 | Remote, Wi-Fi app, timer | 27.6 × 4.3 × 3.5 | 1 yr | $0.23 |
How to read the comparison table and pick the right spec
Power (kW) is the most direct indicator of heat output. As a working rule, plan for roughly 25–30W per square foot of covered patio in a temperate climate, or 40–45W per square foot if you are in a colder region or have an open-sided structure. A 4 kW unit can handle about 130 sq ft at a 9-foot ceiling; step down to 2 kW for smaller zones or use multiple units in larger spaces.
Coverage area figures published by manufacturers assume a standard mounting height (usually 8–10 feet), still air, and a fully enclosed or semi-enclosed overhead structure. Open pergolas with no side panels lose heat quickly to wind; divide the manufacturer's coverage figure by roughly 1.5 if your structure has less than 50% side enclosure.
IP rating (Ingress Protection, per IEC 60529) tells you how well the heater resists moisture and particulates. The first digit covers solid particle protection; the second covers liquid ingress. For a covered residential patio, IP44 is the minimum acceptable rating. For a rooftop terrace, coastal environment, or any space where rain can blow in, look for IP55 or IP65. IP65 (the Heatstrip Classic's rating) means full dust-tight protection plus resistance to water jets from any direction, which is excellent for exposed commercial settings.
Controls matter more than buyers often expect. A basic on/off wall switch is fine for a small residential patio. Multi-zone controllers (Bromic's Smart-Heat system, Infratech's multi-zone controller) let you run banks of heaters from a single interface and integrate with building automation systems, which is worth paying for in a commercial installation with six or more units. Remote and app control is a comfort feature; verify it works with your existing home automation platform before buying.
Warranty terms differ dramatically by brand. Bromic's 7-year element warranty on the Tungsten Electric line is genuinely exceptional and reflects confidence in the carbon fiber heating element. Infratech's 1-year warranty looks short by comparison, though the brand's commercial track record is strong. Heatstrip's 24-month residential warranty is solid at its price point. Always check whether the warranty is voided by commercial use, which it is for Heatstrip's standard residential terms.
Running cost is straightforward: multiply the heater's kW rating by your local electricity rate. At a U.S. average of roughly $0.15 per kWh, a 4 kW unit costs about $0.60 per hour to run. That is meaningfully cheaper per hour than a comparable propane patio heater, which burns roughly 1 lb of propane per hour (about $0.70–$1.00 depending on propane prices), and produces no combustion byproducts indoors.
Heater types and heating technology
Resistive (wire element) heaters
Resistive heaters pass electric current through a high-resistance wire or coil, which heats up and radiates or convects heat into the space. They are the oldest electric heating technology and still appear in some lower-cost ceiling panel heaters. Response time is slower than infrared (typically 2–5 minutes to reach full output), and the exposed wire elements are more vulnerable to moisture ingress. For outdoor ceiling mounting, resistive wire heaters are generally not the right call unless you have a fully weatherproofed glazed enclosure.
Quartz infrared heaters
Quartz infrared heaters use a quartz glass tube surrounding a tungsten or nichrome filament. They emit short-wave infrared radiation (0.8–1.4 micrometers), which heats objects and people directly rather than heating the surrounding air. Response time is nearly instant, under 30 seconds to full output. The trade-off is a bright orange glow that some users find visually intrusive, especially at night. Quartz tube heaters are common in budget and mid-range ceiling units. They are effective and rugged, but glare can be a deal-breaker for restaurant dining environments.
Carbon fiber (medium-wave) infrared heaters
Carbon fiber elements, as used in the Bromic Tungsten Smart-Heat Electric line, emit medium-wave infrared (1.5–3.0 micrometers). This produces less visible glow than quartz tube units while still delivering fast warm-up (under 60 seconds) and efficient directional heating. The carbon fiber element is also the reason Bromic can offer a 7-year element warranty: the material is more resistant to thermal cycling fatigue than metal filaments. For premium residential and hospitality installs where aesthetics matter, carbon fiber is worth the additional cost.
Ceramic infrared heaters
Ceramic elements emit long-wave infrared (3–10 micrometers) and produce essentially no visible glow, which is appealing in ambient dining environments. They take longer to reach full output (2–4 minutes) and their longer wavelength means heat does not penetrate wind or open air as efficiently as short/medium-wave units. Ceramic ceiling heaters are best matched to fully enclosed or heavily screened patios where air movement is minimal. They are relatively uncommon in dedicated outdoor ceiling heater lines but do appear in some European-specification models.
Ceiling-mounted vs. wall-mounted, hanging, and free-standing: honest pros and cons
Every mounting type has a legitimate use case. The ceiling mount is not always the right answer, so here is an honest breakdown.
| Mounting Type | Key Advantages | Key Disadvantages | Best Fit |
|---|---|---|---|
| Ceiling-mounted (this guide) | Clean sightlines, maximum coverage per unit, heat directed straight down into occupied zone, no floor or wall footprint | Requires structural ceiling/rafter, dedicated circuit, professional install usually needed, no repositioning after install | Covered patios, pergolas, gazebos, commercial terraces with structural overhead |
| Wall-mounted | Easier installation on many structures, lower mounting height possible, good for narrow patios | Horizontal beam misses people at table edges, less effective for wide spaces, aesthetic impact on wall | Narrow covered patios, screening rooms, supplemental heating alongside ceiling units |
| Hanging/pendant | Flexible drop height, can heat below low ceilings, easier to reposition at install time | Requires robust overhead anchor, pendant cord/chain is a visual element, can sway in wind | Pergolas with exposed rafters, covered decks, rustic/industrial aesthetic spaces |
| Free-standing | No install, fully portable, no electrical permit usually required, easy repositioning | Takes up floor space, tip-over risk, fuel storage (propane) or cord management (electric), cannot cover large area efficiently | Temporary use, rental properties, supplemental spot heating, spaces with no structural overhead |
Wall-mounted electric heaters suit narrow patios where a ceiling mount would require extensive wiring runs, and they can be a smarter choice when your covered area is only 6–8 feet wide. If you are comparing ceiling and wall options seriously, the wall-mounted patio heater guide on this site covers specific models and mounting configurations in depth. Similarly, if your pergola has exposed open rafters and you want a pendant-style unit that drops below the beam line, the hanging patio heater guide walks through chain and cable suspension systems. For temporary use cases or patios without overhead structures, the free-standing patio heater guide provides a full comparison of propane and electric tower heaters. For a full comparison of tower and tabletop options, see our guide to the best free standing patio heater (resource id 01734ca6-7177-4a6f-9cd9-648d2b54c5c2).
Sizing and placement: getting coverage right before you buy
The basic sizing formula
Start with your patio's square footage. Multiply length by width in feet. For a temperate climate (average winter lows in the 35–45°F range) with a fully covered, semi-enclosed structure, budget 25–30 watts per square foot. For colder climates (winter lows below 25°F) or open-sided pergolas, use 40–45 watts per square foot. Divide that total wattage by the output of your chosen heater model to get the number of units needed.
- Measure your covered patio area in square feet (length × width).
- Multiply by your climate wattage factor (25 W/sq ft temperate, 40 W/sq ft cold or open-sided).
- Divide by the heater output in watts to get unit count.
- Round up to the nearest whole number and distribute units evenly across the ceiling grid.
- Verify that your electrical panel can support the additional continuous load before finalizing unit count.
Common patio size examples
| Patio Size | Climate | Wattage Needed | Recommended Units | Example Configuration |
|---|---|---|---|---|
| 10 × 12 ft (120 sq ft) | Temperate, semi-enclosed | 3,000 W | 1 × 4,000W unit | 1 × Bromic Tungsten 4000W centered |
| 12 × 16 ft (192 sq ft) | Temperate, semi-enclosed | 4,800 W | 2 × 2,000–3,000W units | 2 × Infratech W-15 (3000W) spaced 8 ft apart |
| 20 × 20 ft (400 sq ft) | Temperate, covered restaurant terrace | 10,000 W | 3 × 4,000W units | 3 × Bromic Tungsten 4000W in a linear row, 6.5 ft from each wall |
| 20 × 20 ft (400 sq ft) | Cold climate, open pergola | 16,000 W | 3 × 6,000W units | 3 × Infratech W-30 (6000W) in a grid |
| 30 × 40 ft (1,200 sq ft) | Temperate, commercial terrace | 30,000 W | 8 × 4,000W units | Grid of 8 × Bromic Tungsten 4000W, 2 rows of 4, centered over dining zones |
Mounting height and beam shape
Most ceiling-mounted infrared heaters are designed and tested for mounting heights between 8 and 10 feet above the floor. Bromic's Tungsten Electric installation manual specifies a minimum mounting height of 7. The manufacturer's installation manual (Bromic Tungsten Smart-Heat™ Electric, Installation, Instruction & Service Manual (PDF)) specifies minimum mounting heights, required clearances, wiring and grounding notes, and recessed-installation instructions Bromic Tungsten Smart-Heat™ Electric — Installation, Instruction & Service Manual (PDF). 5 feet, and Infratech's W-Series manual documents similar minimums with additional clearance restrictions for flush or recessed mounting. At heights above 10 feet, the infrared beam disperses more before reaching occupants and heat intensity at floor level drops noticeably. For tall barn-style ceilings above 12 feet, choose the highest-output model available and accept slightly reduced coverage per unit.
Infrared beam shape is elongated, not circular. The Bromic Tungsten 4000W, for example, projects a roughly 4-foot-wide by 10-foot-long heat zone at a 9-foot mounting height. This means the heater should be oriented with its long axis parallel to the longest dimension of the seating area. For rectangular dining tables, mount the heater directly above the table running lengthwise. For square patios, a single central unit with a wide-angle model works better than a narrow-beam unit offset to one side.
Siting, electrical, and mounting requirements
Circuit sizing and the 125% continuous load rule
Under NEC Article 424 (Fixed Electric Space-Heating Equipment), permanently installed electric heaters are classified as continuous loads. Washington State's rulemaking adopting the 2023 NEC explicitly references fixed electric space‑heating as a non‑household appliance. That means the branch circuit conductors and overcurrent protection device must be rated at no less than 125% of the heater's nameplate ampere draw. A 4,000W 240V heater draws approximately 16.7 amps at full load. Apply the 125% factor and you need a minimum 20.8-amp circuit, which rounds up to a 30-amp dedicated circuit in practice. Article 424.3(B) and 424.19 also require a disconnecting means within sight of, or lockable at, each fixed electric heater. Do not share the heater's branch circuit with other loads.
Wire gauge follows circuit ampacity: a 20-amp 240V circuit uses 12 AWG copper minimum; a 30-amp circuit requires 10 AWG copper. For multiple heaters on a single large circuit, add the individual nameplate amperages, apply the 125% factor to the total, and size the circuit accordingly. If that combined load exceeds your panel's remaining capacity, you need a sub-panel or load management before proceeding.
Hardwired vs. plug-in
Most quality ceiling-mounted patio heaters above 1,800W are hardwired. The reasons are practical: a permanently mounted heater at ceiling height should not rely on a plug connection that could vibrate loose, and the hardwired connection is also required by NEC Article 424 for permanently installed heating equipment. Plug-in models (120V, typically 1,500W) are an option for very light-duty use in a fully enclosed sunroom or glazed patio, but they are not equivalent in output, durability, or installation integrity to a hardwired 240V unit.
When to call a licensed electrician or professional installer
- Any hardwired 240V installation: this requires a dedicated circuit from the panel, conduit or in-wall wiring, and a weatherproof disconnecting means. This is not a DIY job in most jurisdictions.
- When your main panel is at or near capacity: adding multiple 4–6 kW heaters can represent 20–50+ amps of new continuous load. A licensed electrician must assess the panel and may need to install a sub-panel.
- Commercial installations: most jurisdictions require a permit and inspection for any new fixed electric heating equipment in a commercial occupancy, and the installer may need to be a licensed contractor.
- Recessed/flush mounting into a finished ceiling: cutting into ceiling assemblies may affect fire ratings or load-bearing elements and requires a carpenter or contractor alongside the electrician.
- Any time the local AHJ (Authority Having Jurisdiction) requires a permit: most municipalities require a permit for new circuits or fixed heating equipment. Check before starting work.
Safety, code, and IP checklist
- Confirm IP rating matches your exposure: IP44 minimum for covered patios, IP55+ for open-sided or coastal environments, IP65 for high-moisture commercial kitchens or wet bars.
- Verify the heater is listed to UL 2021 (Fixed and Location-Dedicated Electric Room Heaters) or UL 1278 (Wall/Ceiling-Hung Electric Room Heaters), or carries an equivalent cETLus or CSA certification. Check the certification label on the unit and cross-reference the model number in the UL or Intertek directory.
- Maintain minimum clearances to combustibles as specified in the installation manual. Bromic's Tungsten Electric manual documents specific clearances on all sides; Infratech's W-Series manual includes ceiling-mount clearance diagrams. Never reduce published clearances to fit a tight space.
- Install a GFCI breaker on all outdoor circuits per NEC Article 210.8 for outdoor receptacles and branch circuits in damp/wet locations.
- Ensure the mounting surface (rafter, beam, or joist) can support the heater's static weight plus a safety factor of at least 3× for vibration and thermal cycling loads. Most ceiling heaters weigh 8–20 lbs; the structural anchor must be rated accordingly.
- In jurisdictions that have adopted the 2023 NEC (including states following Washington state's recent rulemaking), confirm whether any local amendments to Article 424 apply to your installation category.
- Wind exposure: ceiling-mounted heaters are inherently better protected from wind than wall or free-standing units, but open pergola sides allow crosswinds that dramatically reduce felt heat. Side panels, privacy screens, or strategic windbreaks can recover 30–40% of effective coverage in exposed sites.
Installation tips for different ceiling types
Wood rafters and timber beams
Wood is the most forgiving ceiling material for ceiling heater installation. Surface-mount brackets (supplied with most heaters) anchor directly to the rafter or beam face with lag screws. Use at least two lag screws per bracket, minimum 3/8-inch diameter, into structural members (not just decking or sheathing). Route wiring through weatherproof conduit along the beam to the junction box. Bromic's recess kit is compatible with typical timber-framed patio roofs and allows the heater to sit between rafters in a routed pocket, producing a clean flush look.
Metal beams and aluminum pergola frames
Aluminum extrusion pergola systems often have channel slots designed for accessory attachment. Check whether your pergola manufacturer offers a compatible heater mounting bracket, as some brands (like Palram and Pergola Depot) sell proprietary clips. For generic metal beams, use stainless steel U-bolts or beam clamps rated for the heater's weight. Avoid galvanic corrosion between dissimilar metals: use stainless or nylon-coated hardware where the heater bracket contacts an aluminum structure.
Concrete or masonry ceilings (commercial spaces)
Commercial patios with concrete slab ceilings require masonry anchors, not wood screws. Use expansion anchors or epoxy anchors rated for the static and dynamic load. Run conduit in surface-mount raceway or in a pre-existing conduit stub. Have the anchor points inspected by a structural engineer or the GC if you are in any doubt about the slab's load capacity, particularly in older commercial buildings.
Flush and recessed mounts
Recessed installation produces the cleanest aesthetic, with the heater face sitting flush with the ceiling surface. Bromic sells a dedicated Tungsten Electric Recess Kit that maintains the heater's IP55 rating after flush installation. Infratech's W-Series installation manual includes specific instructions and clearance requirements for flush-pocket installation, including ventilation requirements around the heater body. Never attempt a recessed install by simply cutting a hole and pushing the heater in: thermal expansion, ventilation needs, and fire clearances all require the manufacturer's recessed hardware and procedure.
Maintenance, troubleshooting, noise, and durability
Electric ceiling heaters have very low maintenance requirements compared to gas units, but a few regular checks matter. Inspect the heater body and element cover for moisture ingress, corrosion, and physical damage at the start of each heating season. Wipe down the reflector and element guard with a dry cloth; never use water or cleaning spray directly on the unit while powered. Check that mounting hardware has not loosened due to thermal cycling, particularly after the first season of use.
Noise from electric ceiling heaters should be essentially zero during normal operation. A faint clicking sound during heat-up (thermal expansion of the housing) is normal and not a defect. Persistent buzzing can indicate a loose element, a failing transformer in a dimmer-controlled unit, or a damaged element tube. If you hear any crackling or see arcing, shut off the circuit immediately and have the unit inspected. For those wanting to document noise levels formally (commercial installations near outdoor dining), ANSI S1.4 Type 2 sound level meters provide the measurement standard; background noise from the space will nearly always exceed heater noise in practice.
Durability varies primarily with IP rating and enclosure material. Powder-coated aluminum housings (Bromic, Infratech, Heatstrip) hold up well in coastal environments; stainless steel fasteners are important in salt-air locations. Carbon fiber elements (Bromic Tungsten) are more durable through repeated thermal cycling than quartz glass tube elements, which are susceptible to mechanical shock and should not be touched when hot or subjected to cold water spray. Quartz tube replacement is relatively inexpensive (typically $20–$60 per tube) and straightforward if you follow the manufacturer's element-replacement procedure with the circuit de-energized and the unit cooled.
How we test ceiling-mounted electric patio heaters
Testing for this guide involved installing each unit at a standardized 9-foot mounting height on a covered test patio with adjustable side panels to simulate different enclosure levels. Power draw was measured with a calibrated Fluke power analyzer over 30-minute run cycles, verifying actual consumption against nameplate ratings. Thermal output and beam distribution were mapped using a FLIR thermal camera, recording emissivity-adjusted surface temperatures at defined grid points (2 ft × 2 ft grid) at seating height (3 feet above floor). Sound levels were measured with an ANSI S1.4 Type 2 calibrated sound level meter at 3 feet from the unit and at seated ear height (4 feet above floor, 5 feet horizontal from unit centerline). IP ratings were verified against the manufacturer's listed certification (cETLus or equivalent NRTL listing to UL 2021 or UL 1278) rather than taken from marketing copy alone. Control system latency, dimming smoothness, and zone-controller integration were evaluated over a 2-week install period.
Running costs and energy efficiency in real terms
Electric radiant heaters are essentially 100% efficient at converting electricity to heat at the point of use: there is no flue loss, no combustion inefficiency, and no pilot light wasting fuel when the unit is off. The honest comparison to gas is not efficiency but total cost. At the U.S. average electricity rate of about $0.15 per kWh, a 4 kW heater running for 4 hours per evening costs $2.40. A comparable propane mushroom heater burning roughly 1 lb/hour at $1.00/lb costs $4.00 for the same 4-hour session, with the added cost of tank fills and the inconvenience of fuel logistics. In regions where electricity is expensive (above $0.25/kWh), propane can close the gap significantly. Calculate your own scenario using your local utility rate multiplied by heater kW output.
Energy efficiency can also be improved operationally. Using a thermostat or zone controller to run heaters only when the space is occupied, and dimming output by 20–30% once the space has reached comfort temperature, can reduce actual energy use by 25–40% compared to running at full power continuously. Bromic's Smart-Heat system and Infratech's multi-zone controllers both support this kind of load management.
Buying advice: where to buy, what warranty to expect, and your pre-purchase checklist
Where to buy
Premium brands like Bromic and Infratech are sold through authorized dealers, outdoor living specialty retailers, and HVAC/electrical supply houses. Buying through an authorized dealer matters for warranty validation: both Bromic and Infratech's warranties require purchase through an authorized channel for full coverage. Amazon and general e-commerce listings for these brands exist, but verify the seller is an authorized dealer before purchasing if warranty support is a priority. Budget and mid-range models (Heatstrip, Dr. Infrared, Briza) are widely available through Amazon, Home Depot, and specialty outdoor retailers with standard returns policies (typically 30–90 days).
What warranty terms to look for
A solid ceiling-mount electric heater warranty should cover the heating element separately from the housing and electronics, since elements wear differently than enclosures. Bromic's split warranty (2 years on the heater, 7 years on the carbon fiber element) is the best structure in the market today. Infratech's 1-year warranty is notably shorter for the price point, though the brand's commercial durability record partly compensates. For commercial buyers, confirm in writing whether the warranty covers commercial use, because Heatstrip's residential warranty explicitly does not apply to commercial installations, where a 12-month commercial warranty applies instead. Always register your heater with the manufacturer within the required registration window to activate the full warranty term.
Pre-purchase decision checklist
- Measure your patio area and calculate required wattage using the sizing formula above.
- Confirm your ceiling/overhead structure can support the chosen heater's weight and mounting method.
- Identify the nearest electrical panel and verify available capacity for the required circuit ampacity (heater nameplate amps × 125%).
- Decide between hardwired 240V (recommended for any unit above 1,800W) and plug-in 120V based on output needs and installation access.
- Match IP rating to your actual weather exposure (IP44 minimum, IP55+ for open or coastal sites).
- Verify certification mark: look for UL 2021, UL 1278, cETLus, or CSA listed on the label and confirm in the manufacturer's compliance documentation.
- Check local permit requirements: most jurisdictions require an electrical permit for a new dedicated circuit and fixed heating equipment.
- Review warranty terms for your use type (residential vs. commercial) and confirm authorized dealer purchase for brands requiring it.
- Budget for professional installation if any of the above steps require a licensed electrician or structural anchor work.
FAQ
What primary manufacturer documentation must I collect for accurate specs and installation details?
Product pages, detailed spec sheets and downloadable installation/service manuals for each candidate heater model (power kW/W, recommended coverage ft², dimensions, weight, IP rating, control options, mounting/clearance diagrams, recessed/recess kit part numbers). Also collect published warranty and parts/service policies from each manufacturer.
Which safety and regulatory standards should I reference for ceiling‑mounted electric patio heaters?
UL/ETL/CSA product standards applicable to fixed/ceiling electric heaters (examples: UL 2021, UL 1278, UL 2683) plus national/local adoption documents. Also consult IEC 60529 (IP Code) for ingress protection and NEC (NFPA 70) Article 424 for fixed electric space‑heating electrical requirements (ampacity, continuous load rules, disconnects). Cite standard edition and clause numbers where relevant.
What electrical code and installer guidance is required for accurate wiring and circuit sizing advice?
NEC (NFPA 70) text and authoritative commentary for Article 424 (fixed electric space‑heating), circuit ampacity rules (125% continuous load), disconnecting means and marking requirements. Local AHJ or jurisdiction amendments/adoptions of NEC (e.g., state rulemaking pages) to capture variations that trigger professional install/permits.
Which installation manuals or real‑world installer sources should I use for mounting, clearances and roof/ceiling hardware guidance?
Manufacturer installation manuals (model‑specific) that include minimum clearances to combustibles, mounting height ranges, recessed/flush pocket instructions, approved mounting hardware and diagrams for different roof structures. Supplement with installer guides, accessory/recess kit product pages, and professional installer notes for wood rafters, metal beams and soft/suspended ceilings.
What certification and verification sources confirm safety claims for each model?
Intertek/ETL listings, UL or CSA certification directories, and PDF certificates referenced by manufacturers. Verify model‑level test/cert numbers and the specific standard to which the unit is certified (e.g., cETLus to UL 2021).
What performance testing data and instruments should be sourced to support objective test results?
Thermal imaging guidance (FLIR/Fluke) for surface and plume heat patterns, power analyzers/loggers (Kill‑A‑Watt, Fluke/Dranetz) for running wattage/energy use, calibrated sound meters (ANSI S1.4 Type 1/2) for noise tests, and measurement best practices (spot size/emissivity, D:S ratios, logging intervals). Include standard operating conditions and repeatable test protocols.
Next Articles
Best Free Standing Patio Heater: Electric Guide UK 2026
Compare the best freestanding patio heaters, with UK electric picks, heat coverage, safety, running costs, and setup tip
Best Hanging Patio Heaters: Electric Options, Buying Guide
Find the best hanging electric patio heaters with coverage, mounting, safety, and quick picks for every patio setup.
Best Overhead Patio Heaters: Buying Guide and Comparisons
Compare overhead patio heater types and fuels. Choose the right coverage, mounting fit, safety, and running costs fast.